Dialogue Box
For most experiments we will want to present the participants with a dialogue box as the first part of the experiment. This dialogue box can ask the participant for any relevant information like ID, age and gender. In a later chapter we will learn how to get PsychoPy3 to save this information from the participant into a log file.
Figure 3.1: An example of the dialogue box in PsychoPy3.

Creating the Dialogue Box
The first step to creating a dialogue box is importing the necessary modules. The module needed for creating the dialogue box is:
- Gui: for creating dialogue boxes.
You can see how to import the modules in the code below.
from psychopy import gui
Now that we have imported the necessary modules, we can begin creating our dialogue box.
Adding the Title
First I will create a variable for my dialogue box and add a title as I have done in the following code.
myDialogueBox = gui.Dlg(title = "Dialogue Box Exercise")
The name of the variable that represents my dialogue box is myDialogueBox. Then I use the gui.Dlg() function to create my dialogue box. And inside the function I define my title. So the title of the dialogue box that will appear to the participants is Dialogue Box Exercise.
Note: I can add a screen position for the dialogue box by specifying it in the function. E.g.:
myDialogueBox = gui.Dlg(title = "My Box", pos = (400,350))
Adding descriptional text
Now that I have created my dialogue box I can add some text to it. I do this by using the addText() function with the dialogue box variable you now should have created. I can use it to ask the participants to fill in the required information. The code below is an example of how you would use the addText() function and add the text that you want your participants to see right under the title.
myDialogueBox.addText('Please fill in the following fields:')
Adding fields
Next we would like to add three fields, each one asking for one type of information from the participant. For this experiment I want to get my participant's ID number, their age and their gender.
myDialogueBox.addField('Participant ID:')
myDialogueBox.addField('Age:')
myDialogueBox.addField('Gender:')
With the code above I have added the three fields to the dialogue box. The writing inside the function 'Participant ID:', 'Age:' and 'Gender:' is what the participant will see in each field, just like in Figure 3.2 below.
Figure 3.2: An example of how the fields in our Dialogue box look using the code above.

However, we can do more to the fields if we like. We can change the color of the writing by adding color = 'blue' or red or green into the brackets of the addField() function.
We can also specify choices for our participant. So if I wanted the participant to choose from either gender F or gender M, then I would add choices = ['F', 'M'] to my addField() function.
See the code below for an example of how you would implement the new features.
myDialogueBox.addField('Participant ID:', color = "blue")
myDialogueBox.addField('Age:')
myDialogueBox.addField('Gender:', choices = ["F", "M"])
Figure 3.3: An example of the fields in our Dialogue Box with color and choices implemented

Showing the Dialogue Box
Next we would like to tell the program to show our Dialogue box. We ca do this easily by using the show() function with our dialogue box variable. Notice that in the code below we do not specify anything in the brackets of the function, because it is not necessary.
myDialogueBox.show()
Now if you run the code a dialogue box like the one below should appear!
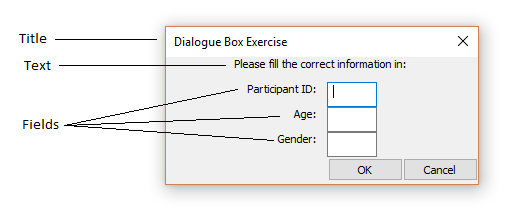
Figure 3.4: An example of the dialogue box we created and annotations showing which parts of the box are the Title, Text and Fields.
Saving the participant information
Now we have learnt how to create a dialogue box. We should next learn how to get PsychoPy3 to save the information from the fields. PsychoPy3 creates a list of the data from each field added in order, and then saves it to an ID variable.
We can do this by first checking if the information in each field is filled in and complete with the correct values.
if myDialogueBox.OK:
The above initiaties the if-sentence that if everything is okay with the data, then we can save the data to a new variable we call ID. That is done as shown in the code below, using the .data function on our dialogue box variable.
if myDialogueBox.OK:
    ID = myDialogueBox.data
Exercises
Create a dialogue box which includes the following information:
- Title: "Sandwich Eating Experiment".
- Text area that says: "Subject Information".
- A red field that asks for the participant's age.
- A blue field that asks for the participant's ID.
- Another text area that says: "Experiment Information".
- A field that asks the participant how many sandwiches they can eat in a row.
- A field that asks whether they are allergic to milk or nuts (with a dropdown menu).
- A field that states the duration of the experiment (15 mins).
Summary of code
#Here we import the gui module, needed for creating Dialogue Boxes:
from psychopy import gui

#Here we create the title of our Dialogue Box:
myDialogueBox = gui.Dlg(title = "Dialogue Box Exercise")

#Here we also create a title for our Dialogue Box, however we also specify a position on the screen for the box:
myDialogueBox = gui.Dlg(title = "My Box", pos = (400,350))

#Here we add some description text to our Dialogue Box (positioned right under the title):
myDialogueBox.addText('Please fill in the following fields:')

#Here we add fields to our Dialogue Box for the participant to fill in with certain information:
myDialogueBox.addField('Participant ID:')
myDialogueBox.addField('Age:')
myDialogueBox.addField('Gender:')

#Here we add a field to the Dialogue Box for the participant to fill in with certain information, however we also specify that the colour of the writing in the field should be blue:
myDialogueBox.addField('Participant ID:', color = "blue")

#Here we add a field to the Dialogue Box for the participant to fill in with certain information, however we specify that we want the participant to choose between two answers:
myDialogueBox.addField('Gender:', choices = ["F", "M"])

#Here we command Python to show the Dialogue Box when we're done editing it:
myDialogueBox.show()

#Here we check whether the information filled into the Dialogue Box is okay. And if it is okay, we save the information the participant filled in, to a variable we call ID:
if myDialogueBox.OK:
    ID = myDialogueBox.data